You can have a hundred reasons to want to format your laptop, or have none and just like to play daredevil sometimes. We are not here to judge, but we will surely try to make your formatting process a breeze. This article will give you a full-on walk-through on how to format a laptop and how to prepare for it for both Windows or Linux operating systems.
What is Formatting and Why to Format?
Formatting a disk essentially means to remove all the contents of that disk irreversibly. This might be desirable for many reasons including wanting to remove the old data and store some new data. This is also known as Factory Reset, as seen on modern mobile operating systems.
Formatting a computer, say your laptop, is similar in the manner that it will remove all the old data and give you a chance to have a fresh start. Now, before we go ahead with all the destruction on how to format a laptop. I assume there must be some stuff in your computer that you might want to preserve such as family pictures, documents and other irretrievable data so we will take a look at some ways to do exactly that.
Okay, so what do we need?
Before we can ask “how to format a laptop”, we must ask ourselves “when can I format a laptop”. We cannot tell you exactly when, but we sure suggest start only once you have the following ingredients!
- A laptop to format.
- Installation ISO of Windows or Linux.
- A flash drive/pen-drive of at least 8 GB capacity.
If you don’t have an Installation ISO for Windows or Linux, you can either use a physical medium like DVD or easily obtain one online. Following links can help you download your desired Operating System:
Note: Ubuntu is one of the many Linux distributions, you may want to explore many others like Mint, Arch Linux, etc depending on your personal and hardware requirements, though for daily use we recommend using Linux Mint.
Save Important Data Before Formatting
Many times when people look on how to format a laptop, they forget the basics – that is, to save their data! There are many ways to save your super-duper important data before you go ahead with formatting your system. We will look at three such ways.
Save Data on an External Physical Drive (Safe and Easy!)
Storing data has never been easier, with the availability of hundreds of different external disks and drives. From pen-drives (flash drives) to external hard-disks to SSDs, any of them can be used to store your personal data. All you have to do is pick a suitable drive for your needs and copy-paste the data onto it.
- Plug your external drive to your laptop and wait for it to be detected by your operating system.
- Once it is detected by your system, you’ll get a notification about it. Open the drive and copy all the important data onto it.
Warning : External drives are usually of a smaller size than your laptop drive. Make sure you have enough space and copy only the essential stuff! Do NOT use this same drive for formatting unless you’ve secured the data on some other device.
Once you’re done with this step, you can proceed on from ingredients section to how to format a laptop section. Don’t worry, we will keep it as simple and easy as possible!
Read More: 5 Best SSD for your PC : The Complete Guide
Save Data on Cloud (Relatively Safe for Small Files)
This requires a special cloud storage service. But don’t worry, if you have a Google or Outlook account then you already have cloud storage! Follow these simple steps to upload your important data onto your cloud storage.
- To visit Google Drive click here and for OneDrive (Outlook’s Cloud Storage) click here (you might be asked to login). This is your personal cloud storage. Only you have access to the files here, unless you explicitly share them with someone.
- Now you can drag and drop your important files and folders in here directly. You can upload as much as 15GB of data on your drive. Don’t worry, that is more than enough for most people.
Note: Time taken to perform this may vary depending on your internet upload speed.
Save Data on the Same Physical Disk (Advanced)
If you are on Windows, you most probably have multiple partitions of your main physical drive. You can view all these partitions by opening “My Computer” or “This PC” (find these by typing it in the search on the bottom left of the taskbar). They’re listed under “Drives and devices” ribbon. If you are sure which partition your windows is installed on (probably C drive) you can copy the data from C drive to any other drive.
Warning: If you follow this, make sure to copy the data from “My Documents”, and other user folders such as “My Photos”, “My Music”, etc as they belong to C drive as well.
Preparing the Ingredients for Format
You can skip this step and go to how to format a laptop section, if you have a physical installation medium. I know, I know we should be jumping onto how to format a laptop already, but just one more little step. We need to prepare the pen-drive for formatting and re-installation of our operating system.
-
Head over to https://rufus.ie, arguably the best USB Bootable Drive tool. You will find it useful every time you ask yourself on how to format a laptop. Download the latest version from the website.
-
Make sure you have your Windows or Linux installation ISO with you. To be confirmed, it will be something like Windows 10 April.iso or Ubuntu 19.iso.
-
Plug in the pen-drive (or any other flash-drive). Make sure you don’t have any important data on it, as we are going to erase all of that!
-
Run rufus, from the Device drop-down menu carefully select the drive you just plugged in.
-
In Boot Selection, click SELECT and pick the installation ISO file.
-
To select a Partition Scheme, you must know of your older partition scheme. In most cases, a relatively newer hardware uses GPT scheme.

So if you bought your computer anytime after 2012 then you can go ahead with GPT.
-
You can go ahead and give it a Volume Label, if you’d like. Proceed by clicking START. It will warn you that it will delete all the data. Once confirmed, press OK and wait for the process to complete.
-
Once the process is complete you’ll be notified of it. You can now safely plug out the drive.
Once done with this process, you will have successfully created a Bootable Device for the Operating System you’re going to install. Now, we are ready to actually format and install a new operating system.
BIOS Settings/Boot Menu Hotkeys
| Manufacturer | Key |
|---|---|
| Acer Netbook | F12 |
| Asus Desktop | F8 |
| Asus Laptop | F8,Esc |
| Asus Netbook | Esc |
| Compaq Presario | Esc, F9 |
| Dell Desktop | F12 |
| Dell Desktop | F12 |
| HP | Esc |
| Lenovo Desktop | F12,F8,F10 |
| Lenovo Laptop | F12 |
| Samsung | Esc |
| Sony | F10,F11 |
| Toshiba | F12 |
Read More: List of PC brands with their corresponding hot-keys
How To Format A Laptop Running Windows
(Scroll down to next section for Linux format and installation instructions)
Proceed by turning your laptop off to begin the format process. It doesn’t matter how you turn it off, you can either do a Shut Down or use the power button. Once it is completely turned off, proceed following the instructions below. Make sure your laptop is plugged into a power source!
- Plug in your Windows Bootable Drive that you just created using the steps above (or insert the physical disk if you have).
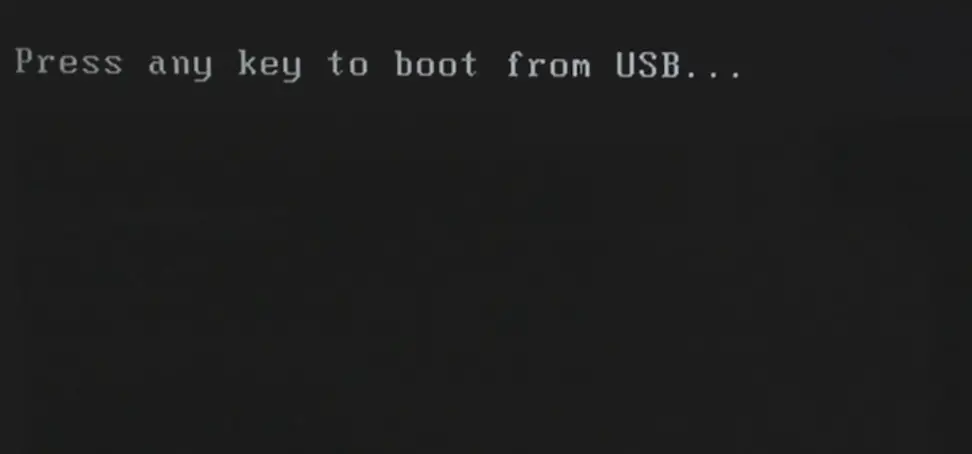
- Turn on your laptop using the power button. You should now be seeing a screen like the following.

- Press any key on your keyboard and it will take you to the installation process.
- Select your desired language, time format and input format and then hit Next.
- Click on the Install Now button, it will ask you for a product key. If you have one you can enter it now or press Skip to enter it later.
- Scroll down the license agreement, check ‘I accept license terms’ and click Next.
- Now select Custom: Install Windows Only.
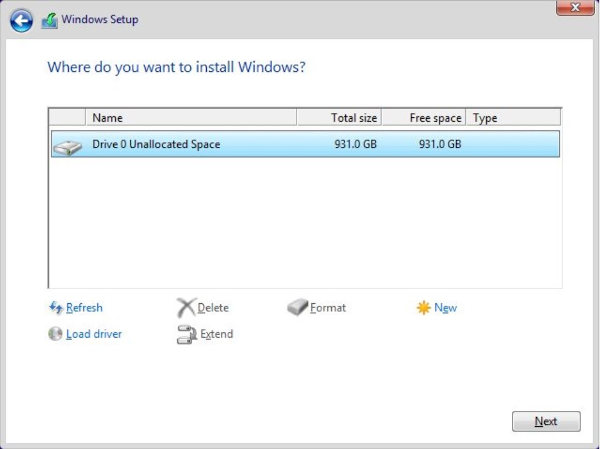
- You will be taken to a screen with your partitions listed on. On this screen, you can format a partition, select a partition to install windows or create a new partition.
(Advanced) : If you decided to store your data on a partition earlier, then proceed with just formatting the Windows partition and selecting it to reinstall the windows again. To have a fresh laptop, I would suggest you select each partition and hit Delete. This will leave you with one single unallocated Space.

- From here on, you can hit New and create partitions if you want. I suggest creating at least two partitions. Make sure you don’t waste out any partition space as unallocated (other than ~250MB of automatic system storage).
- Once you’re satisfied with your partitions, select one of them and click Next.
That’s all folks! This was an easy way to format your laptop and install fresh windows. Now just follow the simple instructions on the screen and you’ll be done with your Windows Installation. Enjoy your fresh new Windows experience.
How To Format A Laptop Running Linux (Ubuntu)
Proceed by turning your laptop off to begin the format process. It doesn’t matter how you turn it off, you can either do a Shut Down or use the power button. Once it is completely turned off, proceed following the instructions below. Make sure your laptop is plugged to a power source!
- Plug in your Windows Bootable Drive that you just created using the steps above (or insert the physical disk if you have).
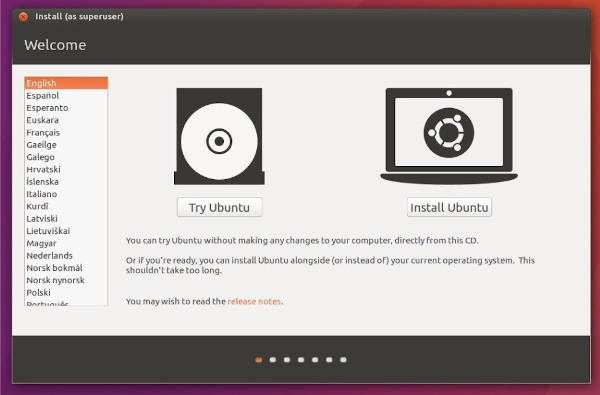
- Turn on your laptop using the power button. You should boot into the USB Bootable drive. Once you’re into the drive, you will be given to either try Ubuntu or Install it.

- Click Install Ubuntu, Select “Install Third-Party Software for …” and click on Continue.
- Depending on your system, you’ll get an option to Install Ubuntu alongside Windows. If you want to proceed with that, just select that option and click Continue.
- You will have to allocate space to your Files and Ubuntu system. Drag the divider on the screen to make the division. Anything over 18GB should be fine for Ubuntu.
- If you are not installing Ubuntu alongside Windows, select Erase disk and Install Ubuntu.
- You will have to allocate space to your Files and Ubuntu system. Drag the divider on the screen to make the division. Anything over 18GB should be fine for Ubuntu.
- Follow the on-screen instructions selecting your region and continue to install.
- Set a username and password for your system and click Continue.
- Once the installation finishes you’ll be presented with Ubuntu.
That’s all folks! This was an easy way to format your laptop and install Ubuntu Linux. Enjoy your fresh Ubuntu experience.
Note: The process to install other Linux distros is almost same.
Ending Note
So we learnt how to format laptop in an easy and safe way and install Windows or Ubuntu on your laptop. This can be performed on any kind of laptop or desktop computer. Always remember, formatting a laptop or desktop computer should be the last option that you take, you can always find ways to clean laptop without format. But we do get it that sometimes a fresh start is all you need hence this easy guide on how to format a laptop should always come handy.
Do remember, due to the evolving nature of the Operating Systems, some options may be named differently, but the crux of how to format a laptop and installation of operating system should remain the same. Feel free to ask questions in the comment section.
MORE FROM INKCUE
- How to Create System Image in Windows 10 and Restore from it
- Best HP Laptops Under Rs. 50,000 in 2020
- Wi-Fi 6 : All About It and Why Is It Superior
- 5 Best Smart Watches in 2020
- Android TV : Why Is It Awesome?

About Author
Akshay Jain
Tech and Science Enthusiast. Talk to me about that tech graphics card for gaming or the latest research in machine learning and statistics. I’m all ears!
